You might have various reasons to transfer pictures from your smartphone to desktop or laptop. Regardless, you can usually do that in a few simple steps. Moreover, you can apply various methods to accomplish this task.
Do you want to transfer images from your iPhone to your computer? Then, the procedure might slightly differ depending on whether you are using a PC or Mac
Here, we will look at how to download pictures from iPhone to computer. You can apply the one you find to be the most convenient for the task.
4 Ways to Transfer iPhone Pictures to Your PC
Do you want to transfer your iPhone pictures to a PC? Here are the primary ways you can do that:
-
Through the File Explorer
Using the File Explorer is probably the simplest way to transfer files from an external device to your PC. You must connect your iPhone to your PC with a USB cable to do this. Open the File Explorer once you have set up the connection. Then, open your iPhone drive and find the photos in question.
Right-click the pictures and click on ‘Move’. Then, navigate to the drive on your PC where you want to transfer the photos. Paste them there, and you can open the files on your PC.
-
Import the Photos from iTunes
You can also use the iTunes app to import your iPhone photos to a PC. And, this works quite similarly to the previous method. However, you cannot import iPhone photos using all iTunes versions. So, make sure the app version you are using supports this function. Download iTunes from the Apple website if you do not already have this app installed.
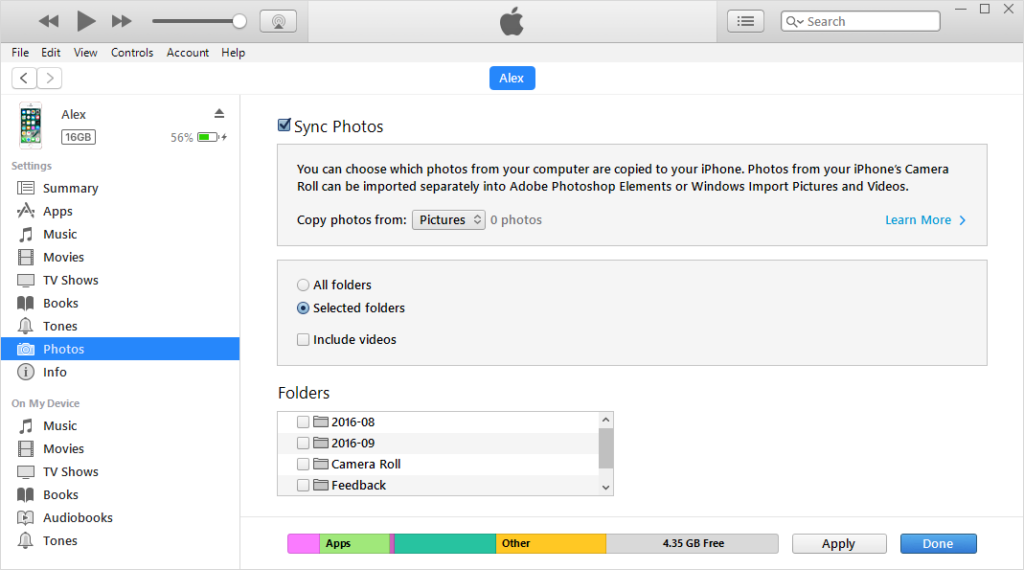
Connect your iPhone to your PC over a USB cable. Opt for trusting your PC on your iPhone if the option comes up. Not trusting the connected computer will prevent you from accessing the iPhone photos on your PC. Open iTunes once you have connected your iPhone. Select your iPhone from the menu and go to the Photos section under Settings.
Find the Sync Photos option on the right panel and click on it. Then, choose a folder and select one to import it on your PC. Click on Apply to start the import and wait until the process is complete.
-
Download from iCloud
Do you have the iCloud app installed on your PC? If yes, then you can download your iPhone pictures to your PC through it. But, enable the iCloud Photos feature on your iPhone to continue. So, open the Settings and enable this feature if it is disabled.
Open the iCloud app on your PC and sign in using your Apple credentials. Make sure the iCloud Photos is enabled on this app on your iPhone. Then, check the box next to ‘Download new photos and videos to my PC’ in the iPhone Options.
You can also change the folder for importing your iPhone photos. Click on ‘Change’ next to the download option and select any drive on your PC.
-
Using the Autoplay Feature
Does your Windows system have the Autoplay feature? If yes, then you can use that to download photos from your iPhone as well. Enable this feature on your PC and connect with your iPhone through the USB port. This should bring up an ‘AutoPlay’ pop-up on your screen. Click on ‘Import pictures and videos’ to transfer the files to your PC.
Do you want to change the transfer location? Then, click on ‘Import Settings’ and choose a drive or folder you want to use. Click on ‘Ok’ to save the changes if you have made any.
Ways to Transfer iPhone Photos to Mac
You can also transfer your iPhone photos to your Mac easily by various methods. Here are some of the most convenient ones among them:
Through Photos
Connect your Mac and iPhone over a USB cable connection. Make sure to select ‘Trust this computer’ if the pop-up appears on your iPhone. Open Photos on your Mac after you have connected your iPhone to it. Check the Import section and select your iPhone once you have found it.
Select the picture you would want to transfer to your Mac. Click on ‘Import All’ if you want to transfer everything. Otherwise, click on ‘Import Selected’ to import only selected photos and wait until the importing is complete.
Through Emails
Do you want to download only a few pictures from your iPhone to your computer? In that case, you can simply use the email to do so remotely. Open the picture in Photos and opt for sharing it by clicking the Share icon. You can also select more than one picture for sharing through email.
Click on Mail among the sharing options and select the email you have on your Mac. Send the email, and then download the photos through the mail on your computer.
Through AirDrop
You can also use the AirDrop feature to share any photos from your Phone to Mac. But, you must enable this feature on your Mac first if it is disabled. You can do that by going to the Finder window. Make your Mac visible to all nearby devices and enable Bluetooth if your device prompts you.
Open Photos on your iPhone and click on Select at the top-right corner. Click on the Share icon once you have selected the photos you want to share. Select AirDrop as the sharing medium and click on your Mac device to send the photos to it. Then, click on Accept on your Mac to accept the shared files.
Transfer Pictures from iPhone to Computer Easily
As we have seen here, there are many possible ways to share iPhone photos with PCs or Macs. You can go for a USB connection or a wireless one as per your requirements. Regardless, you would surely find all of the aforementioned methods to be quite easy.