Apple’s iPhone XR has a built-in screen recorder feature which can be useful when making a tutorial. Users can record the screen for their friends to let them know how to perform certain tasks on their phones. For instance, you can record the iPhone XR screen to show someone how to save a video or upload them on YouTube.
Some iPhone users use this feature to record the sound of the Instagram story of their acquaintance. You can also record the device’s screen when on a FaceTime call or phone call with a family member. Do you want to record the screen of your favourite game? Ensure to enable the screen recording feature from your iPhone
The screen recording feature might not work on all iOS apps. There are a few apps that restrict users from recording the screen due to security and privacy reasons. For instance, streaming apps like Netflix, don’t allow you to record videos. However, you can screen-record the streaming site’s content using third-party apps.
Easy Steps on How to Screen Record on iPhone XR
It is pretty easy to record the screen of the iPhone XR model. However, you must ensure there is sufficient space on the device before the recording. Otherwise, you won’t be able to store the recorded files on your iPhone. Thus, remove the unwanted files and clear the app cache to generate more space on the device.
Here are the steps to screen record the iPhone XR:
- Access the Settings app
Unlock the iPhone and when the home screen opens, search for the Settings app. However, locate “App Library” if you didn’t add “Settings” on the iPhone XR’s home screen. Head towards the search field and write “Settings”. Tap on the Settings app from the searched results to open it.
- Find Control Center
When the Settings window opens, scroll down to the menu on the left until you locate “Control Center”. Choose “Customise Controls” when the next window appears on the iPhone XR screen.
- Enable the Built-in Screen Recording Feature
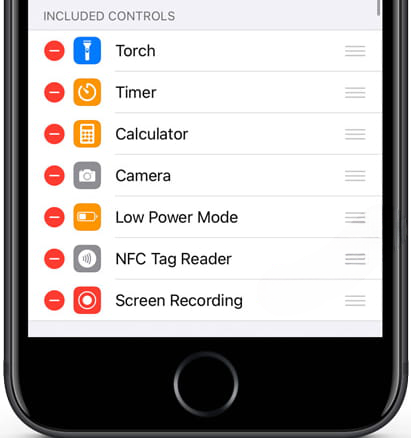
Have you enabled the iPhone XR’s screen recording feature before? It will then appear in the first list within the “INCLUDE” section. If you didn’t see the screen recording feature in the list, tap on “MORE CONTROLS”.
Choose the green plus “+” button to add the screen recording feature on iPhone XR. Besides, you can also remove it from the “Included Controls” list by clicking the red button on the left. However, if you don’t want to record an app screen, close the Settings window and proceed to the next step.
- Record the iPhone XR Screen
Screen recording will be added to the iPhone XR’s “Control Center”. Open the Control Center, and swipe down from the top right edge of the screen. Afterwards, press and hold the record symbol to start the screen recording. However, you won’t get any sound from these recorded videos.
If you want to record a video with sound, press the “microphone” icon and select “Start Recording”. iPhone XR will automatically start to record the screen with audio after 3 seconds.
- Stop the Screen Recording
Open the “Control Center” and press the red bubble to stop recording the desired screen. Alternatively, you can tap on the red line in the status bar at the top of the iPhone XR screen and press “Stop”.
A message will appear at the top of the iPhone XR screen stating that the recorded video has been saved to “Photos”. Access the Photos app to find your recently added screen recording files.
Best Screen Recording Tips for iPhone XR Users:
Many users experienced problems when recording the screen from their iPhone XR. Enable “Do Not Disturb” mode to avoid unwanted interruptions while recording the screen.
Access the Settings app, scroll down to find “Focus”, and tap “Do Not Disturb”. You can also set a time to turn on this feature automatically. Users can choose to enable this feature when using a certain app. Besides, you can upload the screen recordings on any cloud server or social media platform via Photos.
Screen Recording not Working on iPhone XR? Try Out these Fixes
iPhone XR’s screen recording feature is super convenient to use, but it might stop working due to software glitches. This screen recording feature won’t function even if it’s enabled on the device.
However, you can eliminate this problem by following these effective solutions:
- Force Restart the iPhone XR
Force restarting an iPhone XR can help you to fix the technical glitches, and the screen recording will work again. Close all the apps that are running on the device’s background first. Press and release the iPhone XR’s Volume Up button quickly.
Next, press and release the iPhone XR’s Volume Down button. Then, press and hold its side button and release it when the Apple logo appears. Open the app where you were previously recording the screen. If the screen recording feature works, you have solved the issue successfully.
- Install the Latest iOS for iPhone XR
An out-of-date operating system can stop you from recording the iPhone XR screen. Thus, you must update the latest software on the device to resolve the issue. Access the Settings app by going to the iPhone XR’s home screen. Scroll down to the window and locate “General” afterwards.
Choose “Software Update” and check if there is any new update available for iPhone XR. If yes, tap on “Install” and “Download” to get the latest update for the device. Restart the iPhone XR and try to record the screen, and check if the error is solved.
- Check the Privacy Restrictions
Sometimes, the screen recording icon might be greyed out in the iPhone XR’s Control Centre. Usually, it occurs due to Parental Control restrictions. You can fix this problem by modifying the content restrictions. Go to the App Library from the home screen, scroll down to the page and select “Screen Time”.
Navigate to “Content & Privacy Restrictions” and enter the Screen Time password when prompted. Choose “Content Restrictions” when the next window appears on the iPhone XR screen. Tap on “Screen Recording” and tick the “Allow” option.
Open the Control Center, and you will see the screen recording icon is now activated. You can start recording the screen by tapping on the red bubble from the Control Center. Open the Photos app once done and share it with your friends or family members.
- Reset the iPhone XR Settings
iPhone XR’s screen recording feature might also fail to work due to misconfiguration. If you have changed any phone settings, the iPhone might refuse to record the screen. Thus, reset the iPhone XR’s default settings to eliminate the screen recording error.
Open the Settings app from the device’s home screen first. Scroll down to the Settings window and choose “Reset” afterwards. Select “Reset All Settings” and wait until iPhone XR displays the confirmation message.
Click “Reset All Settings”, and restart the phone once the process is complete. Tap the screen recording option and check if the error is resolved.
Should You Use any Third-Party app to Record the iPhone XR Screen?
Many iPhone owners prefer to use third-party utilities over the built-in screen recorder due to its limited functionality. However, these apps can access your iPhone XR data and might not be reliable to use.
Some third-party screen recording apps might be blocked by protected apps, like YouTube. Thus, it will be better to avoid using these apps to secure the iPhone from unwanted data breaches.